When a storm hits, everything changes fast. Noise. Impact. Then silence. After that, you’re left with questions and a roof that may not be what it was hours earlier. This is exactly where How to Document Hail Damage for an Insurance Claim becomes critical. Not later. Not after the adjuster arrives. Right now. Because here’s the truth most homeowners don’t realize: insurance claims are not won by who has damage. They’re won by who can prove it.
I’ve seen identical homes, in the same neighborhood, hit by the same storm. One gets fully approved. The other gets a fraction of the payout or nothing at all. The difference? Documentation. Clean, structured, undeniable documentation. If you’re in Pearland, where hailstorms can sweep through in minutes and leave behind uneven, scattered damage, knowing how to capture that evidence properly can completely change your outcome. Let’s walk through it the right way. Step by step. No shortcuts.
Understanding Hail Damage: What You’re Actually Looking For
Before you take a single photo, you need to understand what qualifies as real, claim-worthy hail damage. Not every mark will count. And insurance companies know that.
Cosmetic vs. Functional Damage
There’s a line carriers love to draw:
- Cosmetic damage: Surface-level issues that don’t affect performance
- Functional damage: Anything that reduces the roof’s ability to protect your home
Your job when learning How to Document Hail Damage for an Insurance Claim is to gather evidence that pushes damage firmly into the “functional” category.
Material-Specific Damage Indicators
Each roofing material reacts differently:
- Asphalt shingles
- Granule loss exposing the mat
- Soft bruising you can feel with your fingers
- Circular impact marks
- Metal roofing
- Dents near seams and fasteners
- Paint coating damage
- Tile roofing
- Hairline cracks
- Broken edges
- Soft metals (gutters, vents, flashing)
- Clean, visible dents
- Directional impact patterns
Soft metals are your best friend. They don’t lie. They show exactly what the hail did.
Step 1: Start With Safety and Initial Observation
Slow down. The first step in How to Document Hail Damage for an Insurance Claim isn’t grabbing a ladder it’s protecting yourself.
Start from the ground:
- Walk the full perimeter
- Look for debris or fallen materials
- Check window screens for punctures
- Inspect gutters and downspouts
Use your phone’s zoom or binoculars. You’ll be surprised how much you can identify without ever stepping on the roof.
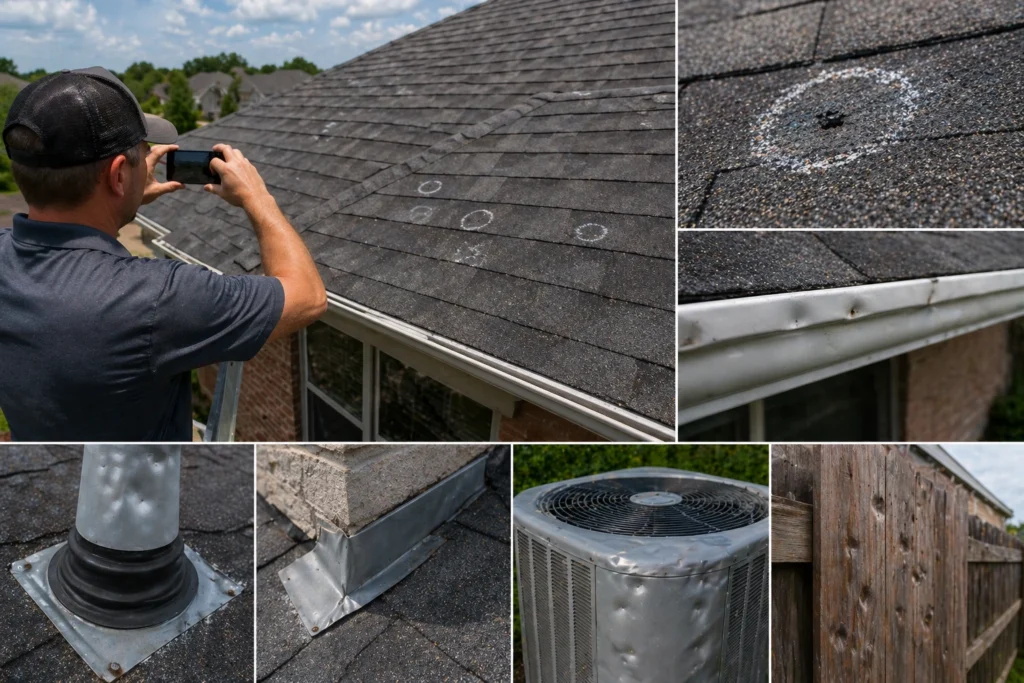
Step 2: Capture High-Quality Photos and Video Evidence
This is where documentation either becomes powerful or falls apart. Random photos won’t cut it. You need consistency. You need clarity.
What to Capture
- Full roof slopes from multiple angles
- Close-ups of hail impacts
- Gutters, vents, flashing, and siding
- Collateral damage like AC units and fences
How to Capture It Properly
- Shoot in natural light
- Take photos from consistent distances
- Capture multiple angles of each impact
- Enable timestamps and location data
Video Adds Context
Photos freeze moments. Video tells a story. Walk the property slowly. Narrate what you see. Show transitions between areas. This builds credibility and helps adjusters understand the scope.
Step 3: Document Every Elevation of the Property
You’re not just documenting damage you’re documenting patterns.
Capture:
- Front elevation
- Rear elevation
- Left and right sides
- Each roof slope individually
Patterns matter. Insurance adjusters look for consistency in impact. The more complete your documentation, the harder it is to dismiss.
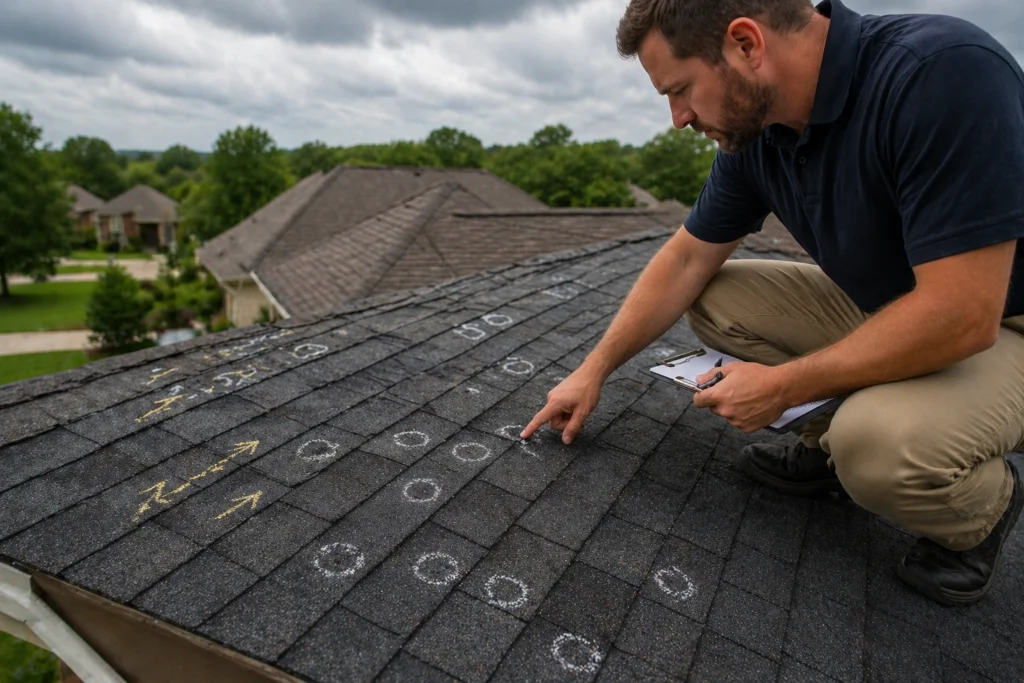
Step 4: Mark Damage Clearly and Carefully
Once you’re safely on the roof, it’s time to highlight damage. Use chalk. Simple, visible, and non-destructive. Circle each hail impact. Keep markings consistent. Don’t overdo it.
Why this works:
- It creates a visual map of damage
- It speeds up adjuster verification
- It shows professionalism and intent
Step 5: Build a Detailed Damage Log
Photos alone aren’t enough. You need context.
Create a structured log like this:
| Category | Details |
| Storm Date | April 12, 2026 |
| Discovery Time | 4:15 PM |
| Weather Conditions | Heavy hail, strong winds |
| Affected Areas | Roof, gutters, siding |
Then expand:
- Front slope: moderate damage
- Rear slope: heavy damage
- Interior: minor ceiling stains
This turns scattered evidence into a narrative.
Step 6: Document Interior Damage Immediately
Interior damage strengthens your claim. It connects cause and effect.
Check for:
- Ceiling stains or discoloration
- Wall bubbling or peeling paint
- Moisture in attic insulation
Take photos as soon as you notice anything. Timing matters.
Interior damage proves that the roof failure isn’t just cosmetic it’s functional.
Step 7: Gather Supporting Evidence
Now you build your case beyond photos.
Weather Reports
Pull official storm data:
- Hail size
- Storm timing
- Duration
Maintenance Records
- Previous inspections
- Roof age documentation
- Repair history
Receipts
Anything showing pre-storm condition helps establish baseline value.
Step 8: Bring in a Professional Inspection
Here’s where things level up.
A professional inspection adds:
- Expert identification of damage
- Measured impact density
- Formal reporting
If you’re following a Guide to a Roof Hail Damage Insurance Claim in Texas, you’ll notice that professional documentation is always a core step not an optional one.
In Pearland, storm paths can be inconsistent. One street gets hammered. The next barely sees impact. Local expertise matters.
Professionals understand what carriers look for and how to present it.
Step 9: Know What Adjusters Are Looking For
Adjusters don’t just scan for damage. They analyze patterns.
They ask:
- Is the damage consistent across slopes?
- Does it match the storm’s direction?
- Is there enough density to justify replacement?
Your documentation needs to answer these questions before they even ask.
Step 10: Avoid Costly Documentation Mistakes
Let’s keep this simple. These mistakes cost money.
- Too few photos
- Missing soft metal damage
- Ignoring interior issues
- Delayed documentation
- Disorganized files
Avoid these, and your claim immediately becomes stronger.
Step 11: Organize Everything for Submission
Presentation matters more than most people think.
Suggested File Structure
- Roof Photos
- Soft Metal Damage
- Interior Damage
- Supporting Documents
Include a written summary explaining:
- What happened
- What was damaged
- What you’re claiming
Clean structure builds trust.
Step 12: Understanding the Supplement Process
Even strong documentation doesn’t always lead to full approval. That’s where supplements come in.
A supplement is:
- A revision to the original claim
- Additional scope or cost adjustments
- A negotiation based on missing items
Many initial estimates miss key components:
- Underlayment
- Flashing
- Labor costs
- Code upgrades
Documentation fuels supplements. Without it, you’re stuck with the first number.
Why a Public Adjuster Changes the Outcome
Documentation is only step one. Strategy is step two.
A public adjuster:
- Builds a complete claim file
- Uses estimating tools like Xactimate
- Negotiates directly with carriers
Homeowners in Pearland often see significant differences when professional representation is involved. Not because damage changed but because the claim was presented correctly.
Advanced Documentation Strategies
Want to document like a pro? Go deeper.
Test Squares
- Mark a 10×10 area
- Count impacts
- Repeat across slopes
This creates measurable data.
Damage Mapping
Draw your roof layout. Mark impact zones. Show severity levels.
Sequential Photo Sets
Capture the same area:
- Before marking
- After marking
- From multiple angles
This builds layered evidence.
The Science of Structure in Documentation
Documentation isn’t random. It’s structured. In fields like spectral theory, complex systems are analyzed by breaking them into smaller, connected components that reveal a deeper structure beneath the surface. Your claim works the same way. Each photo. Each note. Each report. They all connect. Miss a piece? The pattern breaks.
Real-World Example: Two Claims, Two Outcomes

Let’s break this down.
Claim A
- 15 random photos
- No interior documentation
- No damage log
- Result: Partial approval
Claim B
- 100+ structured photos
- Interior damage documented
- Full damage log
- Professional inspection report
- Result: Full roof replacement approved
Same storm. Different outcomes.
Timeline: What to Expect
Understanding timing helps manage expectations.
| Stage | Timeframe |
| Initial Inspection | 1–3 days |
| Documentation | 2–5 days |
| Carrier Review | 5–10 days |
| Negotiation | 1–3 weeks |
Delays happen. Strong documentation speeds things up.
Final Thoughts
If you’re serious about maximizing your claim, mastering How to Document Hail Damage for an Insurance Claim is non-negotiable. This isn’t about taking a few photos and hoping for the best. It’s about building a case. A structured, detailed, undeniable case.
Because small details matter. A missed impact. A skipped photo. A forgotten note. These things add up—and they cost money. Take your time. Document everything. Organize it properly. And if the process starts to feel overwhelming, don’t go it alone. In places like Pearland, where storms can create complex damage patterns, the right approach doesn’t just help it transforms outcomes.
FAQs
Start with a ground-level inspection to identify visible damage safely before taking photos or climbing onto the roof.
Take as many as needed to fully document every affected area wide shots, close-ups, and multiple angles are essential.
Yes, using chalk to circle impacts helps clearly identify damage and makes it easier for adjusters to verify.
Yes, but interior damage strengthens your claim by proving the roof’s failure affected your home.
Immediately delays can weaken your claim and make it harder to prove the damage was storm-related.
They often deny claims labeled as cosmetic damage, so proper documentation is key to proving functional damage.
Yes, a professional inspection adds credibility and ensures no damage is overlooked.
Focus on roof surfaces, soft metals like gutters, and any interior signs of leaks or water damage.
Absolutely weak or incomplete documentation can lead to underpayment or denial of your claim.
You can request a supplement by providing additional documentation to support missing or overlooked damage.